Pyrography is also known as wood burning because of its use of heated metal pens to burn decorative patterns into the wood. If you enjoy sketching or drawing, this art form is perfect for you and can challenge your use of mediums. Similar to paper, each type of wood behaves differently. If you are wondering if there is a superior type of wood to use for your next pyrography craft, look no further! We have done the research for you and have constructed a list of the best wood used for wood burning crafts.
The best kind of wood to use as a canvas for pyrography is light-colored woods. This is because of the light grain and coloring which is a perfect contrast to the dark artwork details from the burning. Soft grained wood burns easily and is also very accessible. These wood types include:
- Beech
- Birch
- Yellow Pine
The ideal wood for pyrography is soft, light, and easy to burn and work with. Continue reading for more details about the steps involved to get your project started!
![A pyrography artist making wood art using a pyrography pen on a piece of wood, What Wood Is Best For Pyrography? [Try these 3 Types]](https://craftsbliss.com/wp-content/uploads/2020/11/What-Wood-Is-Best-For-Pyrography-Try-these-3-Types-1.jpg)
The Best Wood For Pyrography

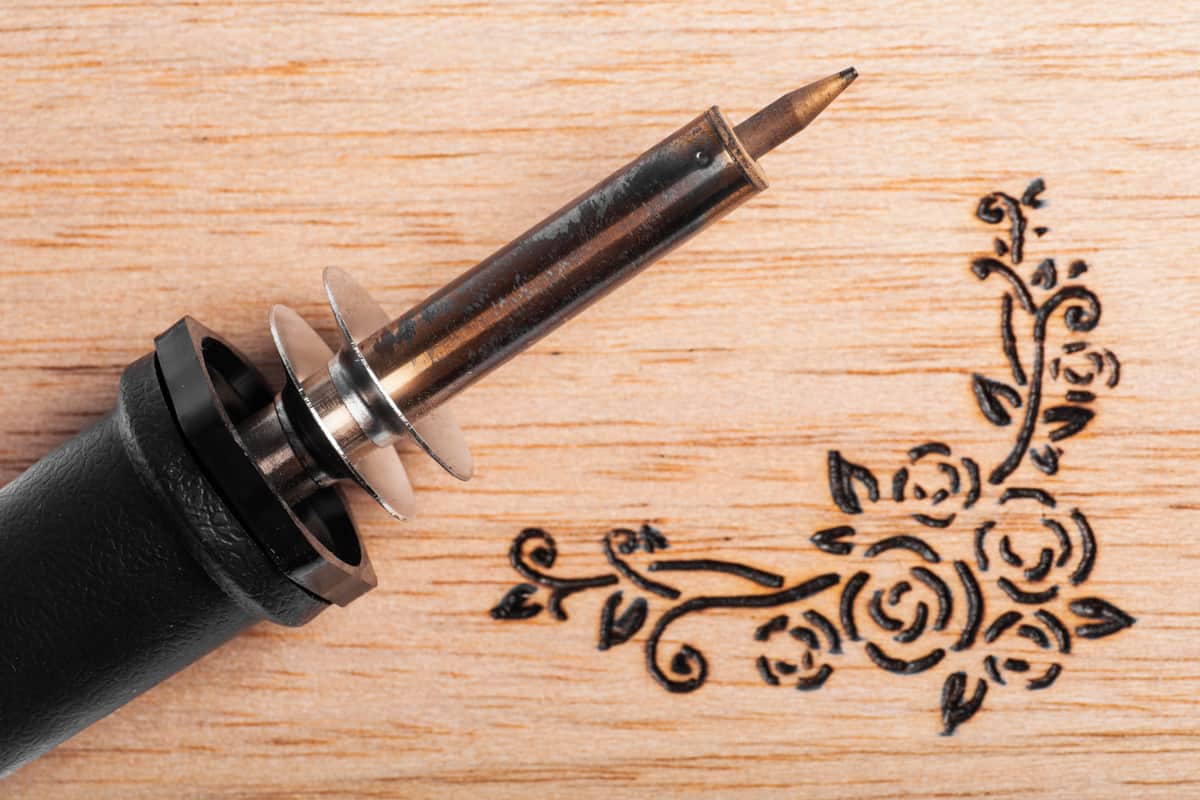
Pyrography is the art of decorating wood by burning marks with a heated object. The term pyrography translates to "writing with fire" from the Greek pur (fire) and graphos (writing).
Although maple, sycamore, walnut, and oak are also popular choices, they are darker woods and not as optimal as light-colored woods. It is also best to use untreated wood to prevent the release of harmful toxins into the air. As mentioned earlier, the best three kinds of wood to use are beech, birch, and yellow pine. Let's take a closer look at each one.
Beech Wood
Beech wood is a light-colored wood that can be found in Europe, Asia, and North America. This wood is basically a white color wood and finely grained. European Beech is a hardwood and extremely popular among the pyrography community. The smoothness of the surface makes for a great work canvas. The creamier the surface, the better the display of your design in the burn marks.
Click here to see this beech wood on Amazon.
This natural beech wood is great for beginners because it is easy to carve and softer than other woods. It is also inexpensive. Beech is a hardwood that bends easily. Beech is a great canvas for pyrography, bringing the value of the piece up with a great design.
Birch Wood
Birch wood is another common hardwood. This wood is used in furniture construction and is slightly more expensive than beech wood. Birch is light yellowish-brown and close-grained. Close-grained wood has a smooth texture and is great for pyrography.
Click here to see this birch wood on Amazon.
This product is great for designing small and fun designs on a durable, light-colored wood surface. Although it has strong durability, birch wood has consistent soft grains that create an even working surface.
Yellow Pine Wood
Yellow pine is another common wood to use in pyrography and therefore it is incredibly inexpensive and easily accessible. Yellow pine can be found at any hobby or craft store. White pine can be easier to burn; however, yellow pine is more accessible.
Click here to see this pinewood on Amazon.
Pine is a clean and smooth wood to use for wood burning. This allows for a crafter to create a detailed and consistent pattern. There are also many shapes in which the pine wood is sold, including plaques, ovals, and hearts.
What Is The Difference Between Pyrography And Wood Burning?
Pyrography is often referred to as "wood burning" and vice versa. The two concepts are practically interchangeable. There is only one real difference between the two art forms. Pyrography, because it means writing with fire, can be practiced on any receptive surface, including wood. Wood burning is specifically done on wood.
However, when you are searching for supplies to use for wood burning, the same supplies can be applied to pyrography. This is because the process of burning details into a surface is the same. The term wood burning is just a tad more literal than writing with fire.
Can You Do Pyrography On Plywood?
Do not practice pyrography on plywood. Plywood is considered a wood to avoid when wood burning. This is due to the density of the wood. Manmade woods contain formaldehyde and can be dangerous to a creator's health if a layer of the wood is burned through. Under the layers of wood is a glue that could potentially be melted. Once the glue is burned, very toxic fumes can be released.
It is best to avoid manmade wood and plywood altogether because the top layer of the wood is so thin. It is a very finicky and risky canvas to work with. If you decide to work with plywood, it is very important that you wear a protective mask, goggles, and gloves. It is also best to work in a well-ventilated area to allow air movement. Always remember to wash your hands thoroughly to avoid dust build-up from any pyrography project.
What Tools Do You Need For Pyrography?
Unless you are a professional, there is no need to buy expensive materials for a pyrography project. Every project will require a wood-burning tool and a piece of wood, at the very least. Additional tools include a stencil, carbon paper for transferring designs, sanders, and nose pliers. Continue reading to find links to the products below.
Wood-Burning Tool
A wood-burning tool is an absolute necessity. To determine the best tool to use, consider the thickness of the pen. Professional burning systems use thinner burning tips. It is important to know how long your tool will stay heated. Knowing when the surge of heat will start can allow you more time to work the design in.
Click here to see more on Amazon.
Wood-Burning Stencil
For beginners, it can be hard to create a design that is neat and clean without a stencil. Stencils come in all sizes and are great for lettering. Most stenciling kits provide the transfer paper.
Click here to see more on Amazon.
Needle Nose Pliers
Pliers are a great tool for any pyrography artist. The needle nose pliers are primarily used to change tips on your iron. A good pair of pliers will protect your hand from the heat and allow you to tighten and secure the tips of the wood-burning pens. Try to avoid metal handle pliers because of the lack of grip protection.
Click here to see more on Amazon.
Black Carbon Paper
Similar to using a stencil, black tracing paper is great for wood burning. It allows for transferring or mirroring a desired wood burning pattern or image. Using quality carbon tracing paper can allow you to save time by easily carving an already outlined design. Carbon paper is created for making clear and dark lines on a wood surface.
Click here to see more on Amazon.
Choice Of Wood
Determine your price range and check your local hobby store to see what kind of woods are available. From there, you can decide which kind of wood is best to use for your first pyrography project.
What Is The Best Temperature For Pyrography?
The best temperature to burn wood at is 320 degrees Fahrenheit (160 to 260 degrees Celsius). After this initial step, there are irreversible changes that can be seen in the wood itself. However, the pyrography burners can reach temperatures that exceed the burning wood temperature at 750 to 1050 degrees Fahrenheit (400 to 565 degrees Celsius).
Depending on the tool used as a wood-burning pen, the different solid point tips can determine how long the soft brass metal takes to heat up and cool down to a safe temperature for removal. Burners typically use screw-style tips that can easily twist off and on. Sometimes using pliers can reduce the cooldown wait time. It is not generally recommended to speed the process up because removing the tip while hot can cause the threats on the soft metal to strip and become thin and weak.
In Closing
Overall, light-colored wood is the best type of wood to use for pyrography. In addition to a wood with a white surface, the grain of the wood should be considered because of the ease it will provide when creating the design. The wood you choose should be easy to burn and consistent in grain pattern.
Remember to avoid man-made woods whenever you can because of the toxicity of the glue underneath the top layer. Lastly, find a good wood-burning pen and a fun design you want to recreate and get to work!
Before you go, be sure to check out these other great crafting guides:


![Read more about the article Can You Glue Fabric To Leather? [Products & Steps Included]](https://craftsbliss.com/wp-content/uploads/2023/01/In-workroom-girl-makes-purse-with-brushglueleather.-500x333.jpg)
![Read more about the article How To Use Epoxy Resin For Crafts [7 Great Ideas]](https://craftsbliss.com/wp-content/uploads/2021/05/A-breathtaking-and-stunning-looking-wooden-chestnut-table-with-an-epoxy-resin-design-in-the-middle-500x333.jpg)

![Read more about the article How To Get A Smooth Paint Finish On Wood [A Complete Guide]](https://craftsbliss.com/wp-content/uploads/2021/09/Painting-timber-boards-outside-with-the-white-paint-500x333.jpg)